Securing S3 Content With CloudFront — Signed URL

Cloud computing has brought fundamental changes to the market backdrop of IT infrastructure globally. Public cloud service providers are facilitating the inherent efficiencies of distributed cloud computing, which is enabling innovative software applications and platforms to be built, while simultaneously enhancing information security and privacy controls.
With More than 32 percent of the world’s public cloud share, It’s no surprise Amazon Web Service (AWS) serves more than 190 countries with scalable, reliable, and low-cost cloud infrastructure. One of its most powerful and commonly used storage services is Amazon S3.
What is S3 ?
Stands for Simple Storage Service (S3), provides object storage — which is used to store and retrieve the data from anywhere over the internet.
Sometimes, this data is shared across multiple platforms which may contain sensitive information. Signed URLs can be used to share the data to the users securely.
Signed URLs
These URLs will have some additional information like expiration date and time, Key-pair Id and signature. With these features AWS provides users to grant temporary access to a specific S3 Object.
How does Signed URL work?
- Everytime the user requests a private file, we need to generate a signed URL. Our application should confirm that the user is authorized to access the file by giving AWS CloudFront the needed permissions and confirming using the signature and key-pair.
- The user can download or stream the content via a signed URL when the request has been approved. When a user accesses the URL in their browser, CloudFront utilizes the public key to verify the signature and ensure that the URL hasn’t been tampered with. The request is denied if the signature is illegitimate.
- If the signature is valid, CloudFront examines the policy declaration in the URL with the given end-date and time. If the request complies with the conditions outlined in the policy statement, CloudFront performs the usual tasks, i.e. checking to see if the requested file is already in the edge cache, sending the request to the origin server if necessary, and returning the file to the user.
- The expiration time is included in the signed URL, making it tamper-resistant, but if it is changed after signing, the signing will be rendered useless and ineffective.
Implementation
For creating the signed URL we need a signer. The signer can be a Trusted Key Group that we created in CloudFront or the AWS Root Account that contains key pairs. Trusted key group is the method that AWS recommends.
Trusted Key Group
The signer who wishes to use CloudFront signed URL must have a public-private key pair. Private key will be used in signer end and Public key will be used by CloudFront end for verifying the URL.
Steps to follow
1. Create a private key using the below command (use git bash to run these commands if you are on Windows) openssl genrsa -out private_key.pem 2048
2. Create a public key from the private key using below command. openssl rsa -pubout -in private_key.pem -out public_key.pem
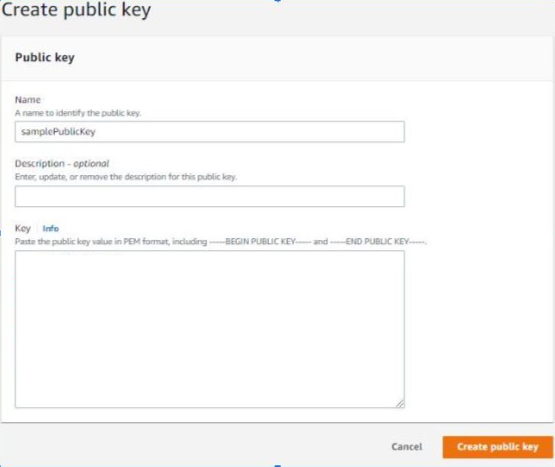
3. Upload public key to CloudFront
- Go to key management.
- Navigate to the public key.
- Add public key:
Key name: Type a name to identify public key.
Key value: Copy the content of the public key you have generated in step 2 and paste it here.
After the above steps are done. Choose Add.
Record the public key id in the .env file.

4. Add public key to key group
- Go to key management.
- Navigate to Key groups.
- On create key group, create a key group and add the public key created in step 3.
5. Adding signer to a CloudFront distribution
- Choose the CloudFront distribution of the S3 bucket that you want to protect using a signed URL.
- Navigate to the Behaviors tab.
- Click Create behavior.
- If we want to give a specific path, mention that path in pattern field or else mention “ * “.
- Choose the S3 Origin.
- Choose yes for Restrict Viewer Access.
- Choose the Trusted key group and select the key group that is created in step 4.
- Choose Simple CORS in response headers policy and create behavior.
- Press Create behavior to create this behavior.

6. Upload the private key file generated in step 1 to the s3 bucket. Record the private key’s file name in our .env file.
7. User AWS CloudFront Signer from AWS SDK for JS to create a signed URL. Use the public key ID from step 3 and private key from step 2 as the parameters.
Summary
In this article, we discussed how CloudFront signed URLs are helpful in terms of security and the use of AWS CloudFront SDK to access your s3 objects as signed URLs.
About the Author
Muthuram is an enthusiastic software engineer, who creates and provides reliable robust software solutions across multiple business areas. Skilled in problem solving. Adventurous person, likes to explore new places and various wide-spread cultures.
About CodeStax.Ai
At CodeStax.Ai, we stand at the nexus of innovation and enterprise solutions, offering technology partnerships that empower businesses to drive efficiency, innovation, and growth, harnessing the transformative power of no-code platforms and advanced AI integrations.
But the real magic? It’s our tech tribe behind the scenes. If you’ve got a knack for innovation and a passion for redefining the norm, we’ve got the perfect tech playground for you. CodeStax.Ai offers more than a job — it’s a journey into the very heart of what’s next. Join us, and be part of the revolution that’s redefining the enterprise tech landscape.
